Accounting with QuickBooks Online Accountant
Setting Up Your Books
Introduction
As stated in Chapter 2 – Accountant Tools, QuickBooks Online Accountant is a Cloud-based application that allows accounting companies to access, store, manage, and process their bookkeeping, payroll, accounting, business analysis, and tax preparation at any time and from anywhere with an Internet-connected device. The features of QuickBooks Accountant also allow accounting firms to access, store, manage, and process their clients’ bookkeeping, payroll, accounting, business analysis, and tax preparation.
Consortia uses QuickBooks Accountant to:
- Perform our bookkeeping, payroll, accounting, business analysis, and tax preparation.
- Manage, support, and supervise our team (professional staff of payroll personnel, bookkeepers, accountants, business analysts, and tax preparers).
- Manage, support, and supervise our clients’ bookkeepers.
- Perform our clients’ accounting, business analysis, and tax preparation.
This chapter is for accountants who use QuickBooks Online Accountant to perform their company’s bookkeeping, payroll, accounting, business analysis, and tax preparation.
Note: When you use QuickBooks Accountant to perform your bookkeeping, payroll, accounting, business analysis, and tax preparation; you’re better able to perform these services for your clients.
Setup Tools
The following tools are needed to set up your company:
- QuickBooks Online Accountant (Get QuickBooks Accountant for free, see Chapter 2 –Accountant Tools, Join the Free QuickBooks Online ProAdvisor Program),
- QuickBooks Online Accountant Online Payments (See Chapter 2 – Accountant Tools, QuickBooksOnline Payments),
- QuickBooks Online Accountant Online Payroll,• Company online bank account(s) compatible with QuickBooks Online Accountant,
- Company credit card(s) (business credit card or personal credit card used only for business)compatible with QuickBooks Online Accountant, and
- Company one sheet, two-part voucher QuickBooks Online Accountant compatible checks.
Accountant Tasks
Your setup tasks include:
- Gather QuickBooks Online Accountant Setup Information,
- Set Up Your Company,
- Set Up Your Lists,
- Set Up Your Bank and Credit Card Accounts (Bank Feeds), and
- Set Up Your Automated Sales Tax.
Before you can perform these tasks, you need to set up your company in QuickBooks Online Accountant. However, we will first address the differences between QuickBooks Online and QuickBooks OnlineAccountant.
Note: When we refer to QuickBooks Online, we are referring to QuickBooks Online Plus.
QuickBooks Online and QuickBooks Online Accountant Overview
We assume you are familiar with QuickBooks Online. Therefore, we only address the unique features of QuickBooks Online Accountant.
Note: If you’re not familiar with QuickBooks, please refer to our Bookkeeping with QuickBooks OnlineGuide.
The layout in QuickBooks Online Accountant differs slightly from QuickBooks Online. Both have a homepage dashboard, a left menu, and toolbar. However, since QuickBooks Online Accountant enables accounting companies to perform their own accounting and assist their clients with their bookkeeping and payroll, and perform their accounting, business analysis, and tax preparation; QuickBooks Online Accountant has additional features.
Homepage Dashboard
The QuickBooks and QuickBooks Accountant dashboards are the same. The QuickBooks Accountant dashboard pertains to your company’s books.
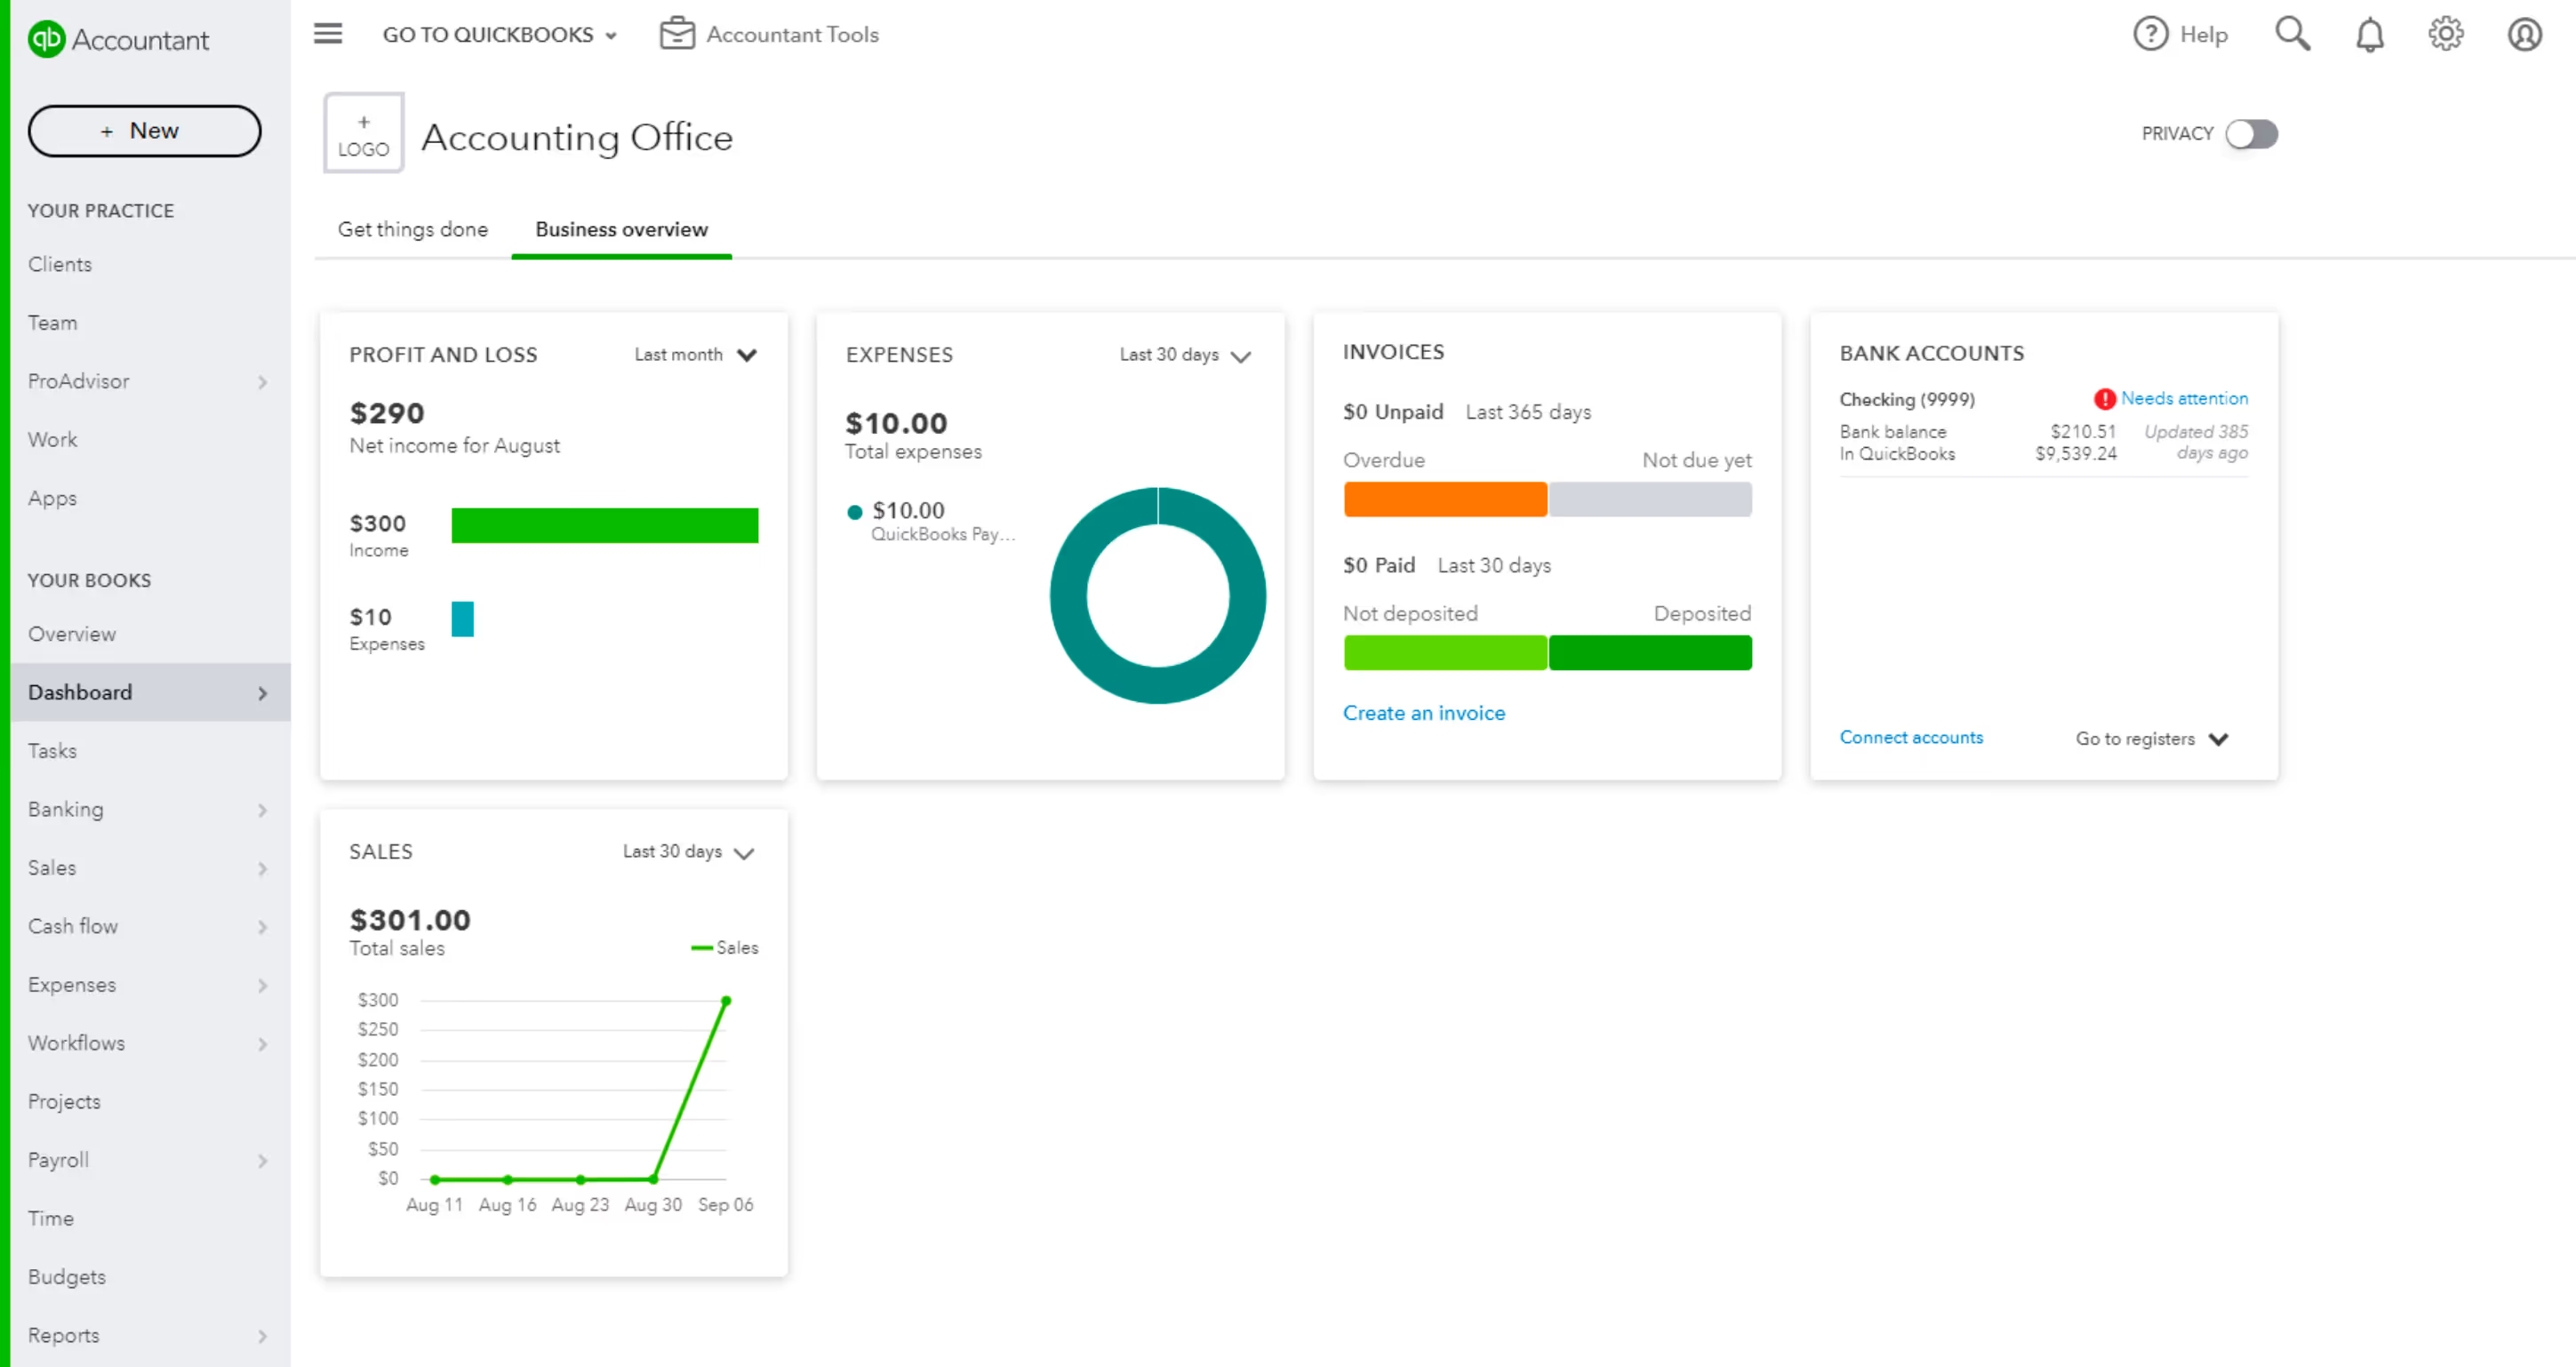
Left Menu
The QuickBooks Accountant left menu displays two categories:
- Your Practice and
- Your Books
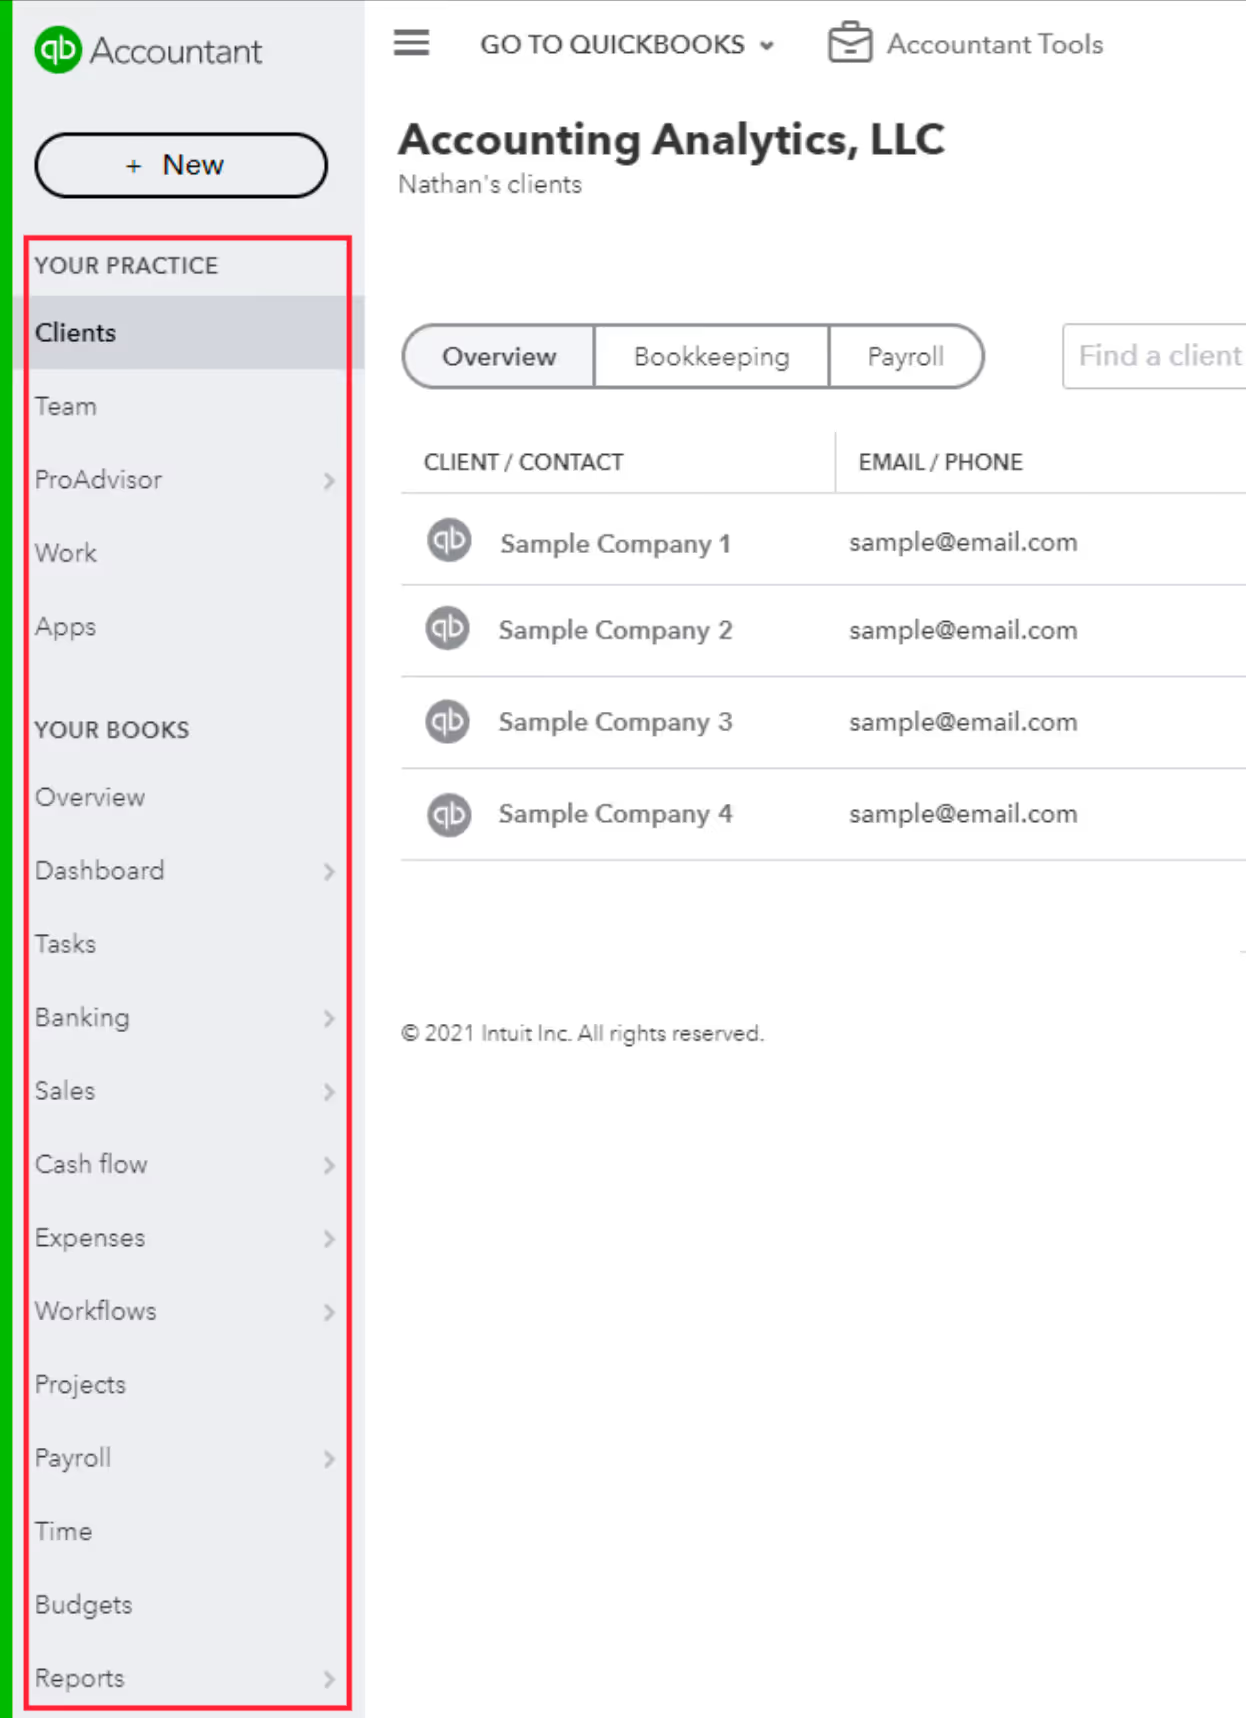
Your Practice includes:
- Clients,
- Team,
- ProAdvisor,
- Work, and
- Apps.
These features enable you to manage your clients, team, ProAdvisor membership, work, and apps. For a
more detailed explanation of these features, refer to Chapter 4 – Setting Up Your Practice.
Your Books includes:
- Overview,
- Dashboard,
- Tasks,
- Banking,
- Sales,
- Cash Flow,
- Expenses,
- Workflows,
- Projects,
- Payroll,
- Time,
- Budgets, and
- Reports.
Note: For a detailed explanation of the Dashboard, Banking, Sales, Cashflow, Expenses, Projects, Payroll, Budgets, and Reports pages, see the Bookkeeping with QuickBooks Online Guide.
Overview
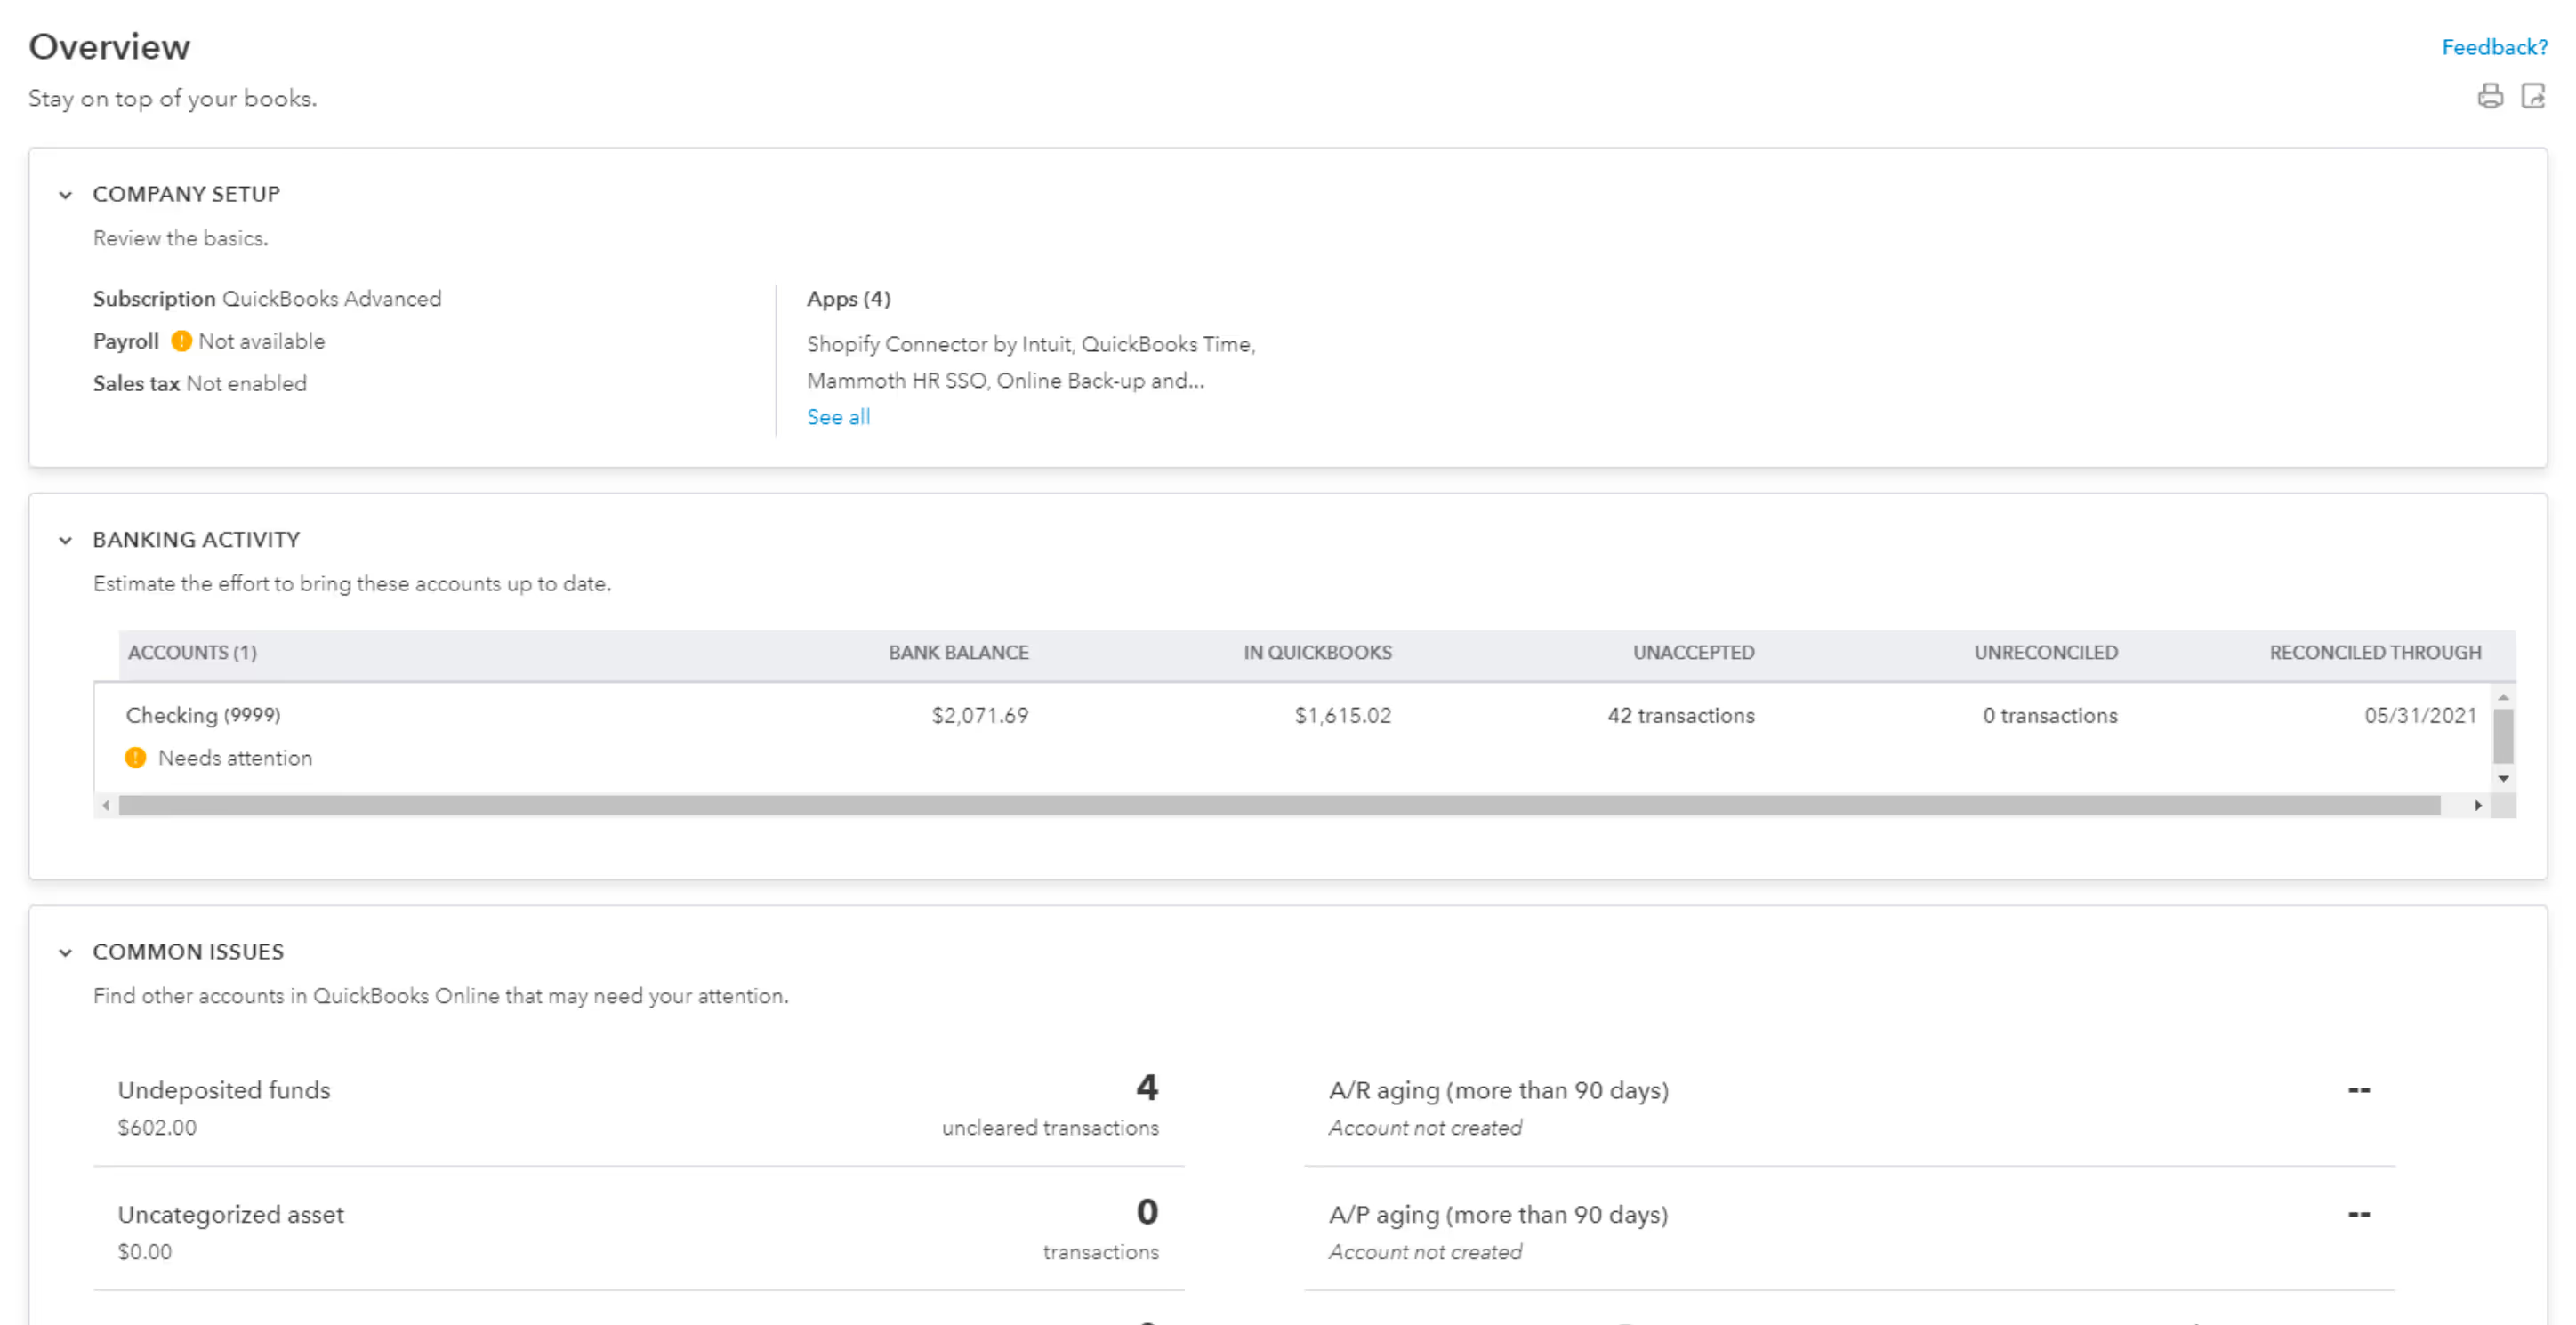
The Overview page displays:
- Company Setup,
- Banking Activity.
- Common Issues, and
- Transaction Volumes.
Company Setup provides your QuickBooks Subscription, Payroll Subscription, Sales Tax enabled or not enabled, and apps.
Banking Activity lists your connected bank and credit card account(s) name, bank balance, QuickBooksOnline Accountant balance, Unaccepted transactions, Unreconciled transactions, and Reconciled Through date.
Common Issues help you find other accounts in QuickBooks Online Accountant that may need your attention such as Undeposited funds, Uncategorized assets, Uncategorized income, Uncategorized expenses, A/R aging more than 90 days, A/P aging more than 90 days, Opening balance equity, and Negative asset and Liability accounts.
Transaction Volumes determine transaction volume workload for bank account transactions, sales receipts, invoices, invoice payments, bank deposits, journal entries, expenses, bills, and bill payments.
Note: When you access your clients’ books through QuickBooks Accountant, the Overview feature displays and provides the same information addressed above for your client.
Tasks
The Tasks page is where you can view, create, assign, and organize tasks for your team.
Workflows
The Workflows page allows you to create workflows to automate common tasks in QuickBooks Online Accountant, such as sending payment reminders to customers. You can also send reminders to your team to complete specific tasks, such as reviewing open invoices.
Time
The Time page takes you to QuickBooks Time. QuickBooks Time allows you to manage and track time for employees and projects, schedule employee shifts, and utilize GPS tracking features.
Commerce
The Commerce page includes features linking additional sales channels to QuickBooks, such as Amazon, eBay, or Shopify.
Toolbar
Like the QuickBooks Online toolbar, the QuickBooks Online Accountant toolbar has an Open and close left menu, Help, Search, Notifications, and Settings (Gear) icons.

Note: The Notifications icon (bell) on the Toolbar displays external notifications from Intuit. There is also a Notifications setting in the Company Settings. This setting displays to internal notifications regarding the work the Primary Administrator receives. See Notifications under Settings below.
Settings
Settings in QuickBooks Online Accountant are arranged somewhat differently than in QuickBooks Online. For example, the QuickBooks Online Settings categories include:
- Your Company – Account and settings, Manage users, Custom form styles, Chart of accounts,Payroll settings, and QuickBooks Labs.
- Lists – All lists, Products and services, Recurring transactions, Attachments, Custom fields, and Tags
- Tools – Order checks, Import data, Import desktop data, Export data, Reconcile, Budgeting, Audit log, Import GoPayment, SmartLook, and Resolution center.
- Profile – Feedback, Refer a friend, and Privacy.
QuickBooks Online Accountant Settings categories include:
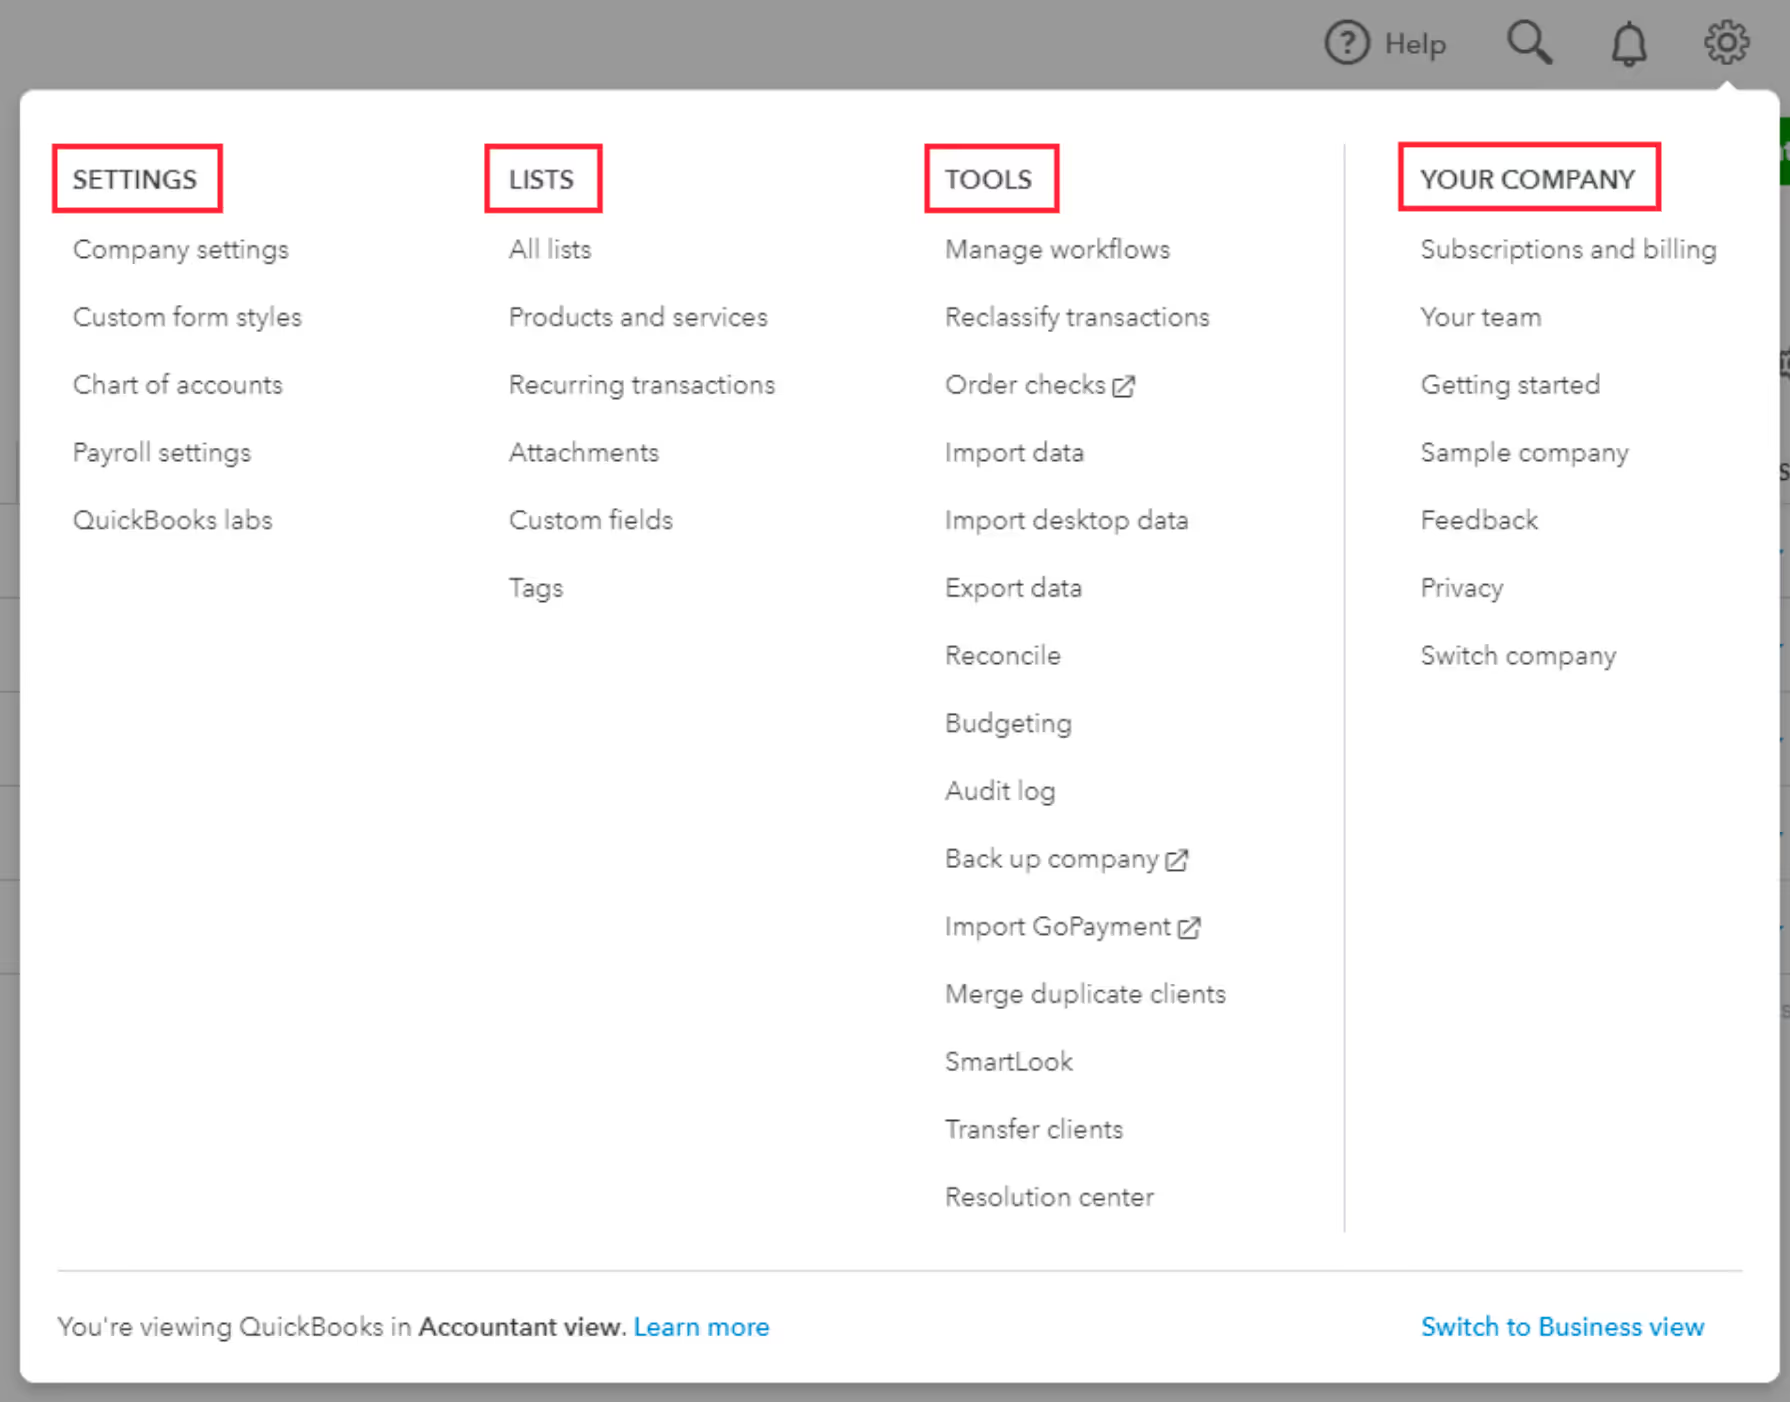
- Settings – Company settings, Custom form styles, Chart of accounts, Payroll settings, and QuickBooks Labs.
- Lists – All lists, Products and services, Recurring transactions, Attachments, Custom fields, and Tags.
- Tools – Manage workflows, Reclassify transactions, Order checks, Import data, Import desktop data, Export data, Reconcile, Budgeting, Audit log, Backup company, Import GoPayment, Merge duplicate clients, SmartLook, Transfer clients, and Resolution center.
- Your Company – Subscriptions and billing, Your team, Getting started, Sample company, Feedback, Privacy, and Switch company.
For an explanation of the QuickBooks Online Settings, refer to our Bookkeeping with QuickBooks Online Guide.
The settings are essentially the same with a few exceptions, including:
- Manage workflows,
- Reclassify transactions,
- Backup company,
- Merge duplicate clients,
- Transfer clients,
- Subscriptions and billing,
- Your team,
- Getting started,
- Sample company, and
- Switch company.
Manage Workflows
Manage workflows takes you to the Workflows page, which is also accessed from the Left Menu.
Reclassify Transactions
Reclassify transactions takes you to the Reclassify transactions tool in Accountant Tools. This tool allows you to do a quickly reclassify the account or class on multiple transactions at once. When using the Reclassify tool, QuickBooks Online Accountant automatically hides transactions that cannot be reclassified.
Backup Company
Backup company links you to an external application that allows you to back up your company file data, including transaction and list data. You can also restore and copy company file data from backups.
Merge Duplicate Clients
Merge duplicate clients is a QuickBooks Online Accountant tool that enables you to merge two clients. The tool allows you to choose which client you want to keep, retain the client’s contact information and all access permissions and billing information, and merge transactions and notes from both clients.
Transfer Clients
Transfer clients allows you to move your clients from one QuickBooks Online Accountant profile to another.
Subscriptions and Billing
Subscriptions and billing takes you to a list of the client subscriptions you are managing. You can view and edit your Accountant-billed subscriptions, Client-billed subscriptions, and Billing details.
Your Team
Your team takes you to the Team dashboard, which is also accessed from the Left Menu. The Team dashboard is where you set up and manage your team.
Getting Started
Getting started is a link to Intuit’s Getting Started with QuickBooks Online Accountant webpage.
Sample Company
Sample company is a QuickBooks Accountant account with a sample company, Craig’s Design and Landscaping Services. The sample allows you to use and become familiar with QuickBooks Accountant.
Switch Company
If you are a user of multiple QuickBooks Online companies, Switch company allows you to quickly switch between these accounts.
Accountant Tools
The Go to QuickBooks and Accountant Tools menus and Profile icon are unique to QuickBooks Accountant.

Go to QuickBooks
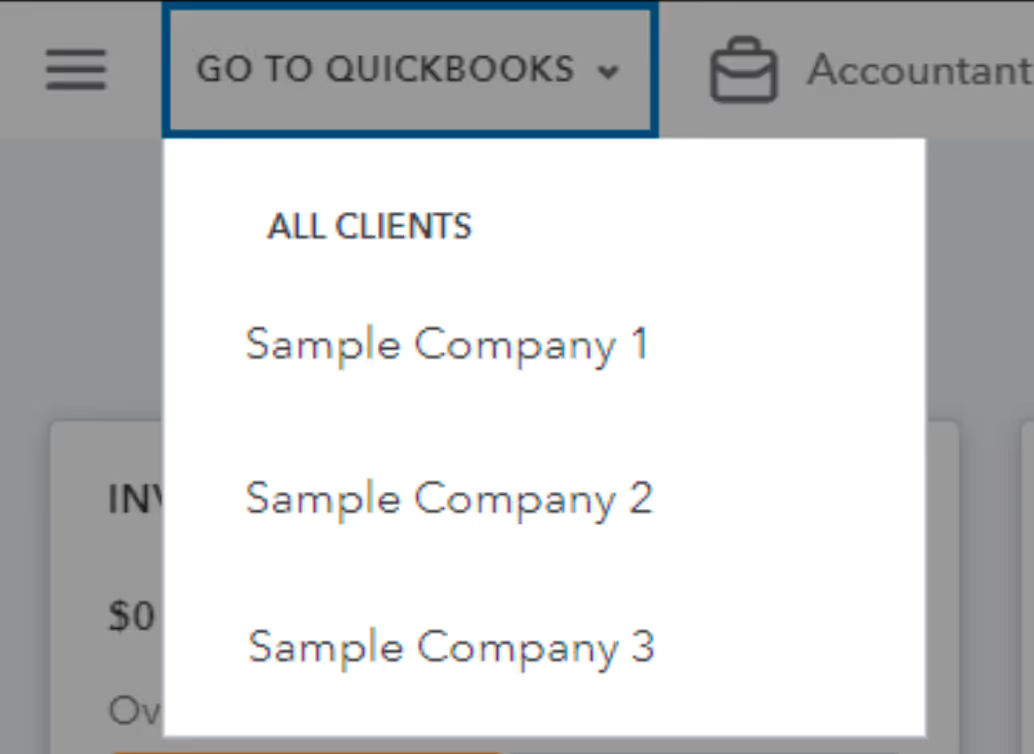
Go to QuickBooks provides a list of and links to your clients entered into QuickBooks Online Accountant. To access a client’s QuickBooks account, scroll to and select the client’s name. When you want to return to your QuickBooks Accountant account, go to the Go to QuickBooks menu, which has changed to the client’s name, and select Back to practice.
Accountant Tools
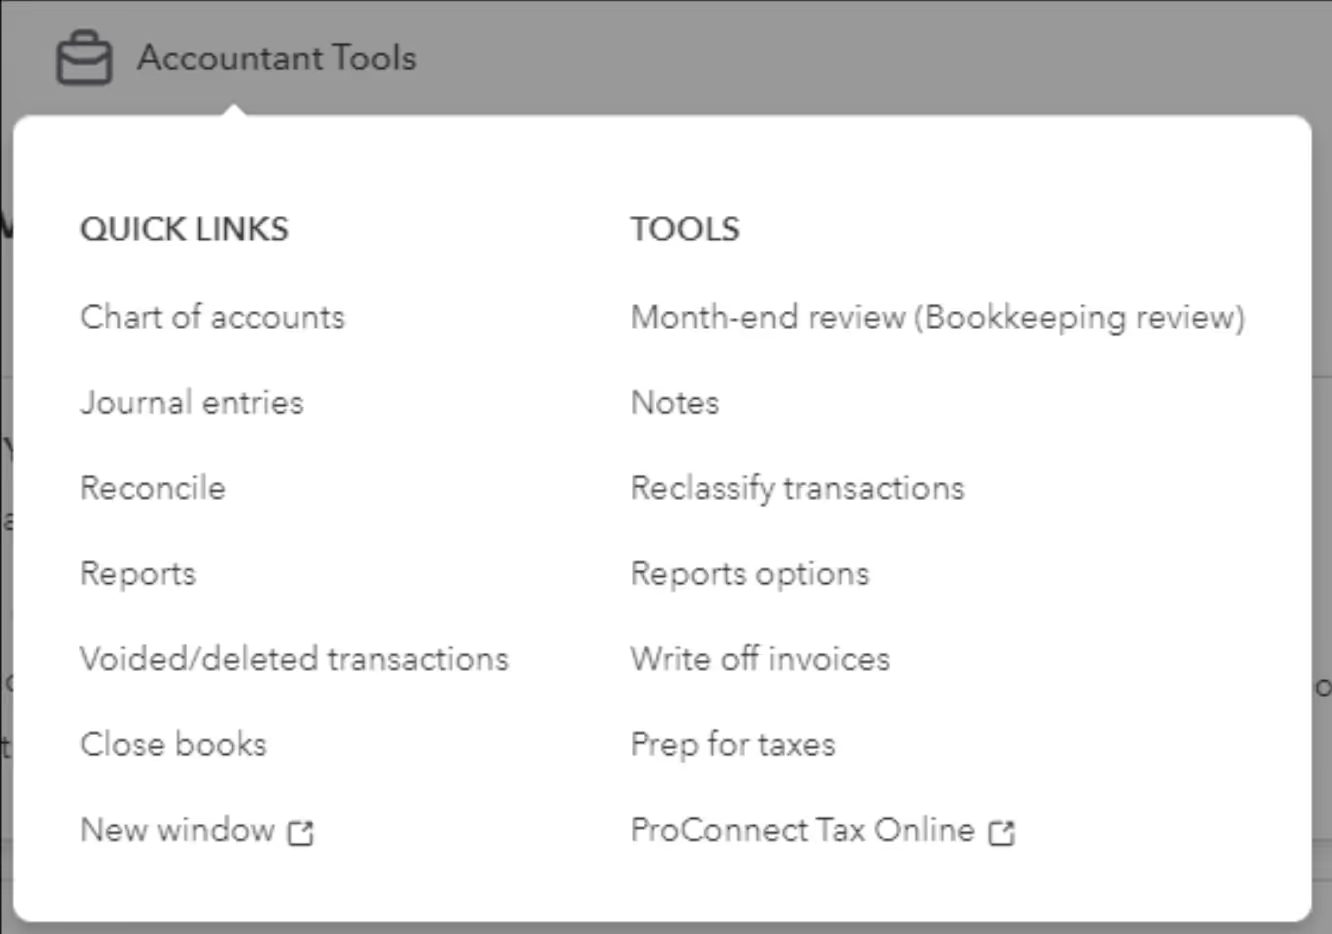
Accountant Tools provides a menu consisting of two categories:
- Quick Links and
- Tools.
Quick Links
Quick Links are links to QuickBooks Online Accountant features used most often when assisting your
clients.
The links include:
- Chart of accounts,
- Journal entries,
- Reconcile,
- Reports,
- Voided/deleted transactions,
- Close books, and
- New window (opens a new browser tab or window).
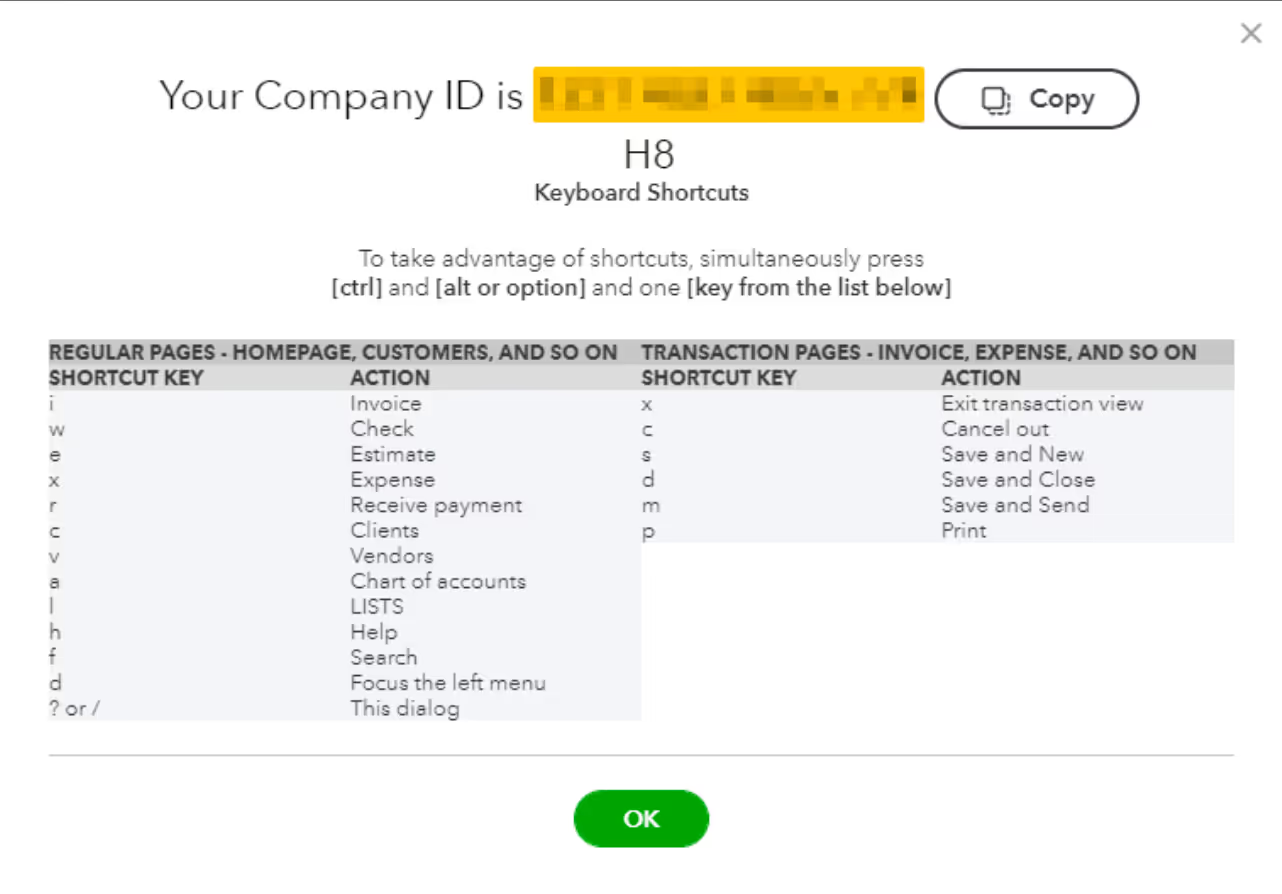
Note: QuickBooks Online Accountant has QuickBooks Keyboard Shortcuts. Using keyboard shortcuts speed up navigation. The shortcuts work in Chrome, Internet Explorer, and Firefox.
To take advantage of QuickBooks keyboard shortcuts, simultaneously press:
ctrl+alt+?(Windows)cmd+alt+?(Mac)
Tools
Tools are QuickBooks Accountant tasks used most often when assisting your clients.
The tools include:
- Notes,
- Reclassify transactions,
- Reports options,
- Write off invoices,
- Prep for taxes,
- ProConnect Tax Online – opens a new browser tab to the ProConnect Tax Online website.
Accountant Tools are addressed later in the guide.
Profile
The Profile icon has Profile and Leads tabs.
The Profile tab is the QuickBooks ProAdvisor’s profile (resume) listed in Intuit’s ProAdvisor Find an Accountant directory at https://quickbooks.intuit.com/find-an-accountant. You fill out your profile by clicking the Pencil icon in the upper right hand corner of each section. Select Save after each section.
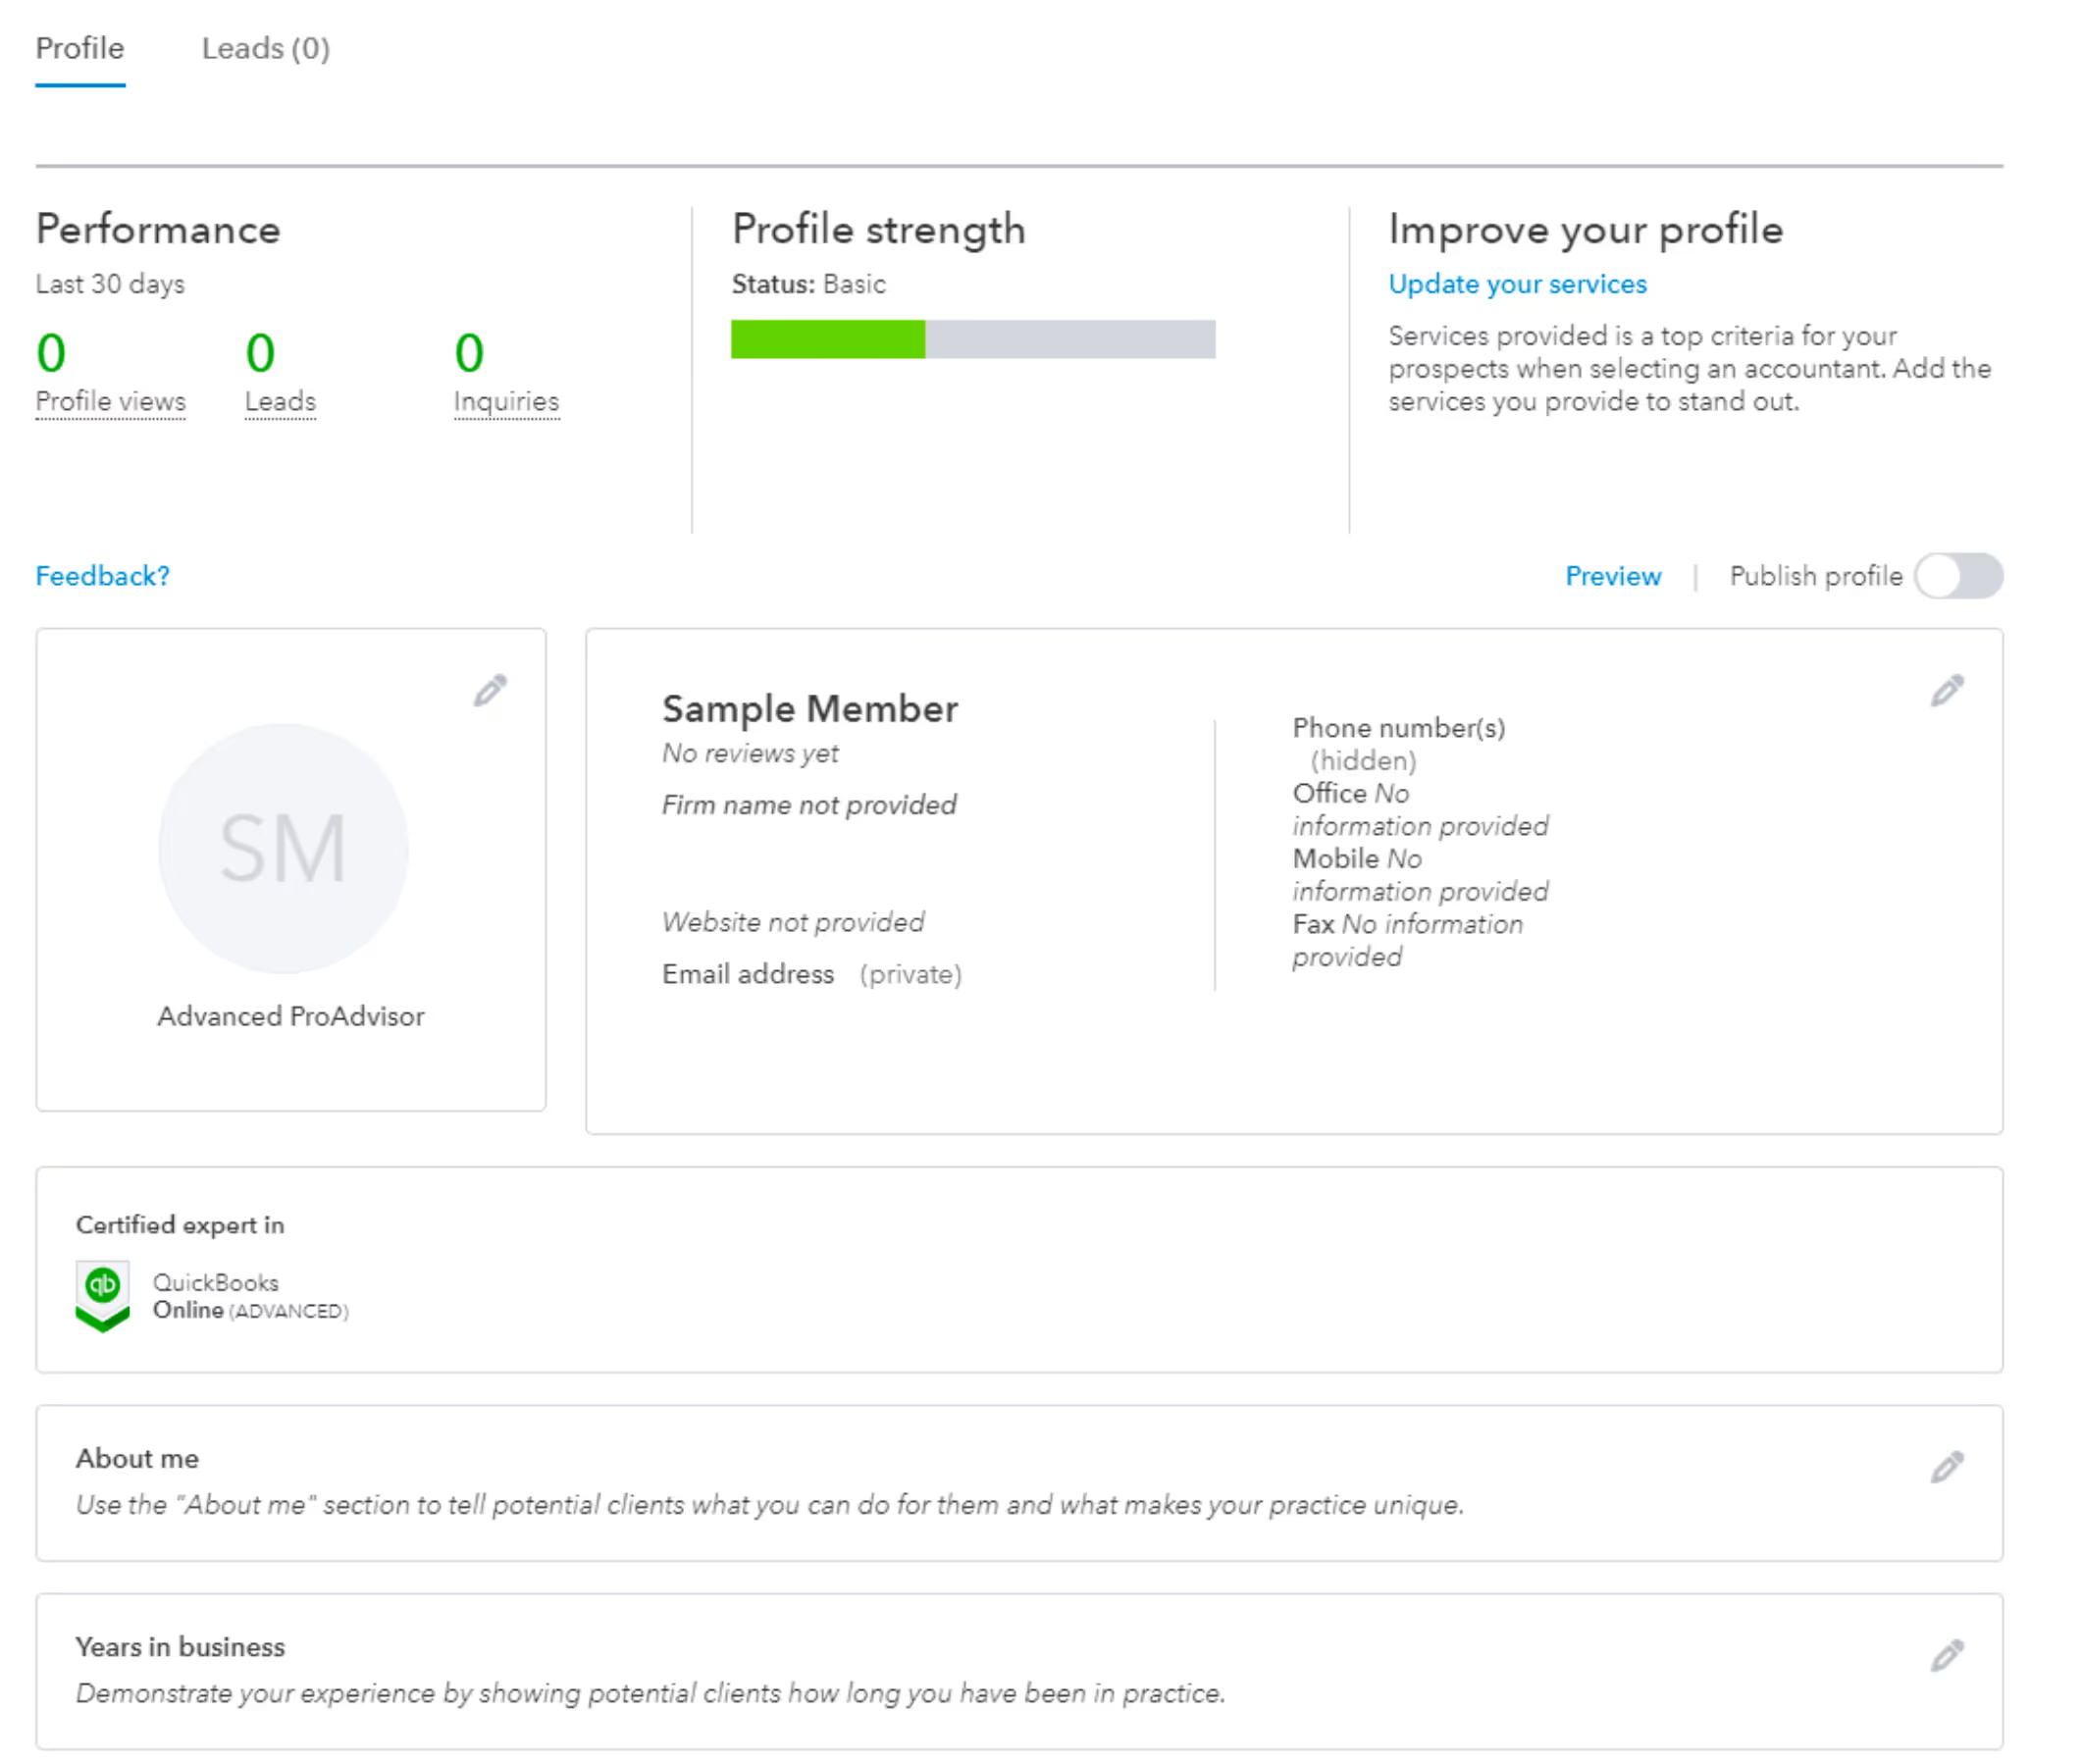
The Profile tab displays:
- Performance – Lists the number of Find an Accountant profile views, leads, and inquiries over the last 30 days,
- Profile strength – Displays the strength of your profile determined by the amount and type of information you’ve completed in your Profile,
- Improve your Profile – Provides suggestions to improve the strength of your profile,
- ProAdvisor information section,
- Certifications section – Lists any certifications you have obtained,
- About me,
- Years in business,
- Consultations,
- Services,
- Industries served,
- Languages,
- Social sites,
- Software expertise,
- Credentials, and
- Client reviews.
Once you’ve completed your Profile, select Preview. When you’re ready to publish your profile on Intuit’s Find an Accountant directory, select the Publish profile radio button.
Note: Your Profile won’t go live until you obtain QuickBooks Online Certification.
The Leads tab (page) lists messages from potential clients generated from Intuit’s ProAdvisor Find an Accountant directory.
Gather QuickBooks Accountant Setup Information
To expedite the setup process, you need to gather the information required to set up your company.
The Accounting with QuickBooks Online Accountant Guide provides a detailed checklist, policies, procedures, tips, and other information you need to complete your setup. The QuickBooks Online Accountant Setup Information Checklist below is organized in the same order as the QuickBooks Online Accountant setup process including:
- Company Settings,
- Custom Form Styles,
- Chart of Accounts,
- Payroll Settings,
- Set Up Your Lists,
- Set Up Your Bank and Credit Card Accounts, and
- Set Up Your Automated Sales Tax.
Company Settings
Company Settings include:
- Company,
- Notifications,
- Sales,
- Expenses,
- Payments, and
- Advanced.
Company
- Company Name:
- Company logo file for sales forms and purchase orders,
- Company name as you want it to appear on sales forms and purchase orders, and
- Legal name.
The legal or registered name of your business is the official name of the entity or person that owns a business. If you’re the only owner of your business (sole-proprietorship) without employees, the legal name can be your full name.
- Contact Info:
- Company address,
- Company address shown on sales forms,
- Company legal address (if different),
- Company address where clients contact you or send payments (if different),
- Legal address used for filing taxes (if different),
- Company email address where QuickBooks (Intuit) can email you,
- Company email address where your clients can email you,
- Company phone number shown on sales forms, and
- Company website shown on sales forms.
- Accounting Method:
- Cash accounting or Accrual accounting.
- Employer ID (EIN):
- Company EIN (Employee Identification Number) or SSN (Social Security Number)
If you’re a sole proprietor with no employees and file no excise or pension plan tax returns, you’re not required to obtain an EIN and can use your social security number. However, we suggest you obtain an EIN to protect your social security information.
To apply for an EIN, go to www.irs.gov/businesses/small-businesses-self-employed/apply-for-an-employer-identification-number-ein-online.
- Company EIN (Employee Identification Number) or SSN (Social Security Number)
- Tax Form:
- Tax form your company files.
- Categories:
- If you assign transactions to service departments or product lines, list those departments of product lines.
- If you assign transactions to different locations, list those locations.
- Customer Label:
- Select the term you use to label those you serve (customers, clients, donors, guests, members, patients, or tenants).
Notifications (Work Notifications)
The Notifications listed in the Company Settings are Notifications specific to the Master Administrator. We suggest you turn all notifications on.
Sales
- Sales Form Content:
- Default payment date/invoice terms,
- Default delivery method (send or print),
- Shipping involved with products/services,
- Custom fields used on sales forms,
- Custom transaction numbering system, if you use one, and
- General fields you want to show on sales forms (service date, discount, deposit, tips, and other custom fields).
- Invoice Payments:
- Payment methods available to customers on invoices (Credit cards and ACH).
- Products and Services:
- Columns you want to show on sales forms (Product/Service, SKU),
- Any special pricing (price rules) you offer to customers, and
- Additional columns you want to show on sales forms (Quantity and Price Rate).
- Late Fees:
- Customer late fees and type (flat fee of percentage of remaining balance),
- Grace period, and
A Grace period provides the customer a period of time after the due date that the late fee will still not be applied. - The label or name you want to use for late fees.
- Progress Invoicing:
- Decision to use progress invoicing, which creates multiple partial invoices from a single estimate
- Messages:
- Greeting used on sales forms (ex. Dear [Full Name]),
- Default email subject line on sales forms,
- Default email message sent with sales forms,
- Decision to email yourself a copy of sales form emails and the email address you want them sent to, and
- Cc and Bcc emails that new invoices are sent to, if applicable.
- Reminders:
- Decision to use auto invoice reminders,
- The number of reminders you want customers to receive regarding invoice payments (up to three) and when you want them to receive the reminders,
- Default subject line on reminder emails,
- Default email message on reminders, and
- Decision to email yourself a copy of reminder emails and the email address you want them sent to.
- Online Delivery:
- How you want sales form emails to display (show short summary in email or show full details), and
- The format that sales forms will be sent to customers (Online invoice, HTML, or Plain text).
Online invoice will send an online link to the invoice. This option allows the customer to see any changes made to the invoice.
HTML email will send the invoice in a nice easy to read format. They will not be able to access the invoice via a link like with the Online Invoice option and you’ll need to re-send the invoice if you make any changes you need the customer to see.
Plain text email will send the invoice in a non-formatted version. This will not contain a link either.
- Statements:
- How you want transactions listed on statements (list each transaction as a single line or list each transaction including all details), and
- Decision to show aging table at bottom of statement.
Expenses
- Bills and Expenses:
- Decision to show items table on expense and purchase forms,
Adds a Product/Service table on expense and purchase forms so you can itemize products and services. - Decision to track expenses and items by client,
Adds a Client column on expense and purchase forms so you can track expenses and items by client. - If expenses and items are billable, mark up rates when expenses are billed to customers and decision to track billable expenses as income (in a single account or in multiple accounts) and whether or not to charge sales tax, and
- Default bill payment terms.
- Decision to show items table on expense and purchase forms,
Payments
- Business Owner Info:
- Owner’s address and mobile phone number.
- Chart of Accounts:
- Accounts that standard deposits and processing fees will be posted to.
Advanced
- Accounting:
- First month of fiscal year and income tax year.
This is for reporting, allowing you to specify any month as the start of your fiscal year (also called your financial reporting year or accounting year).
- First month of fiscal year and income tax year.
- Chart of Accounts:
- Decision to use account numbers, and
- Account that tips will be posted to (if applicable).
- Automation:
- Preferred automatic invoicing schedule.
- Projects:
- Decision to use project financial tracking.
This allows you to see all your sales, expenses, and timesheets by project.
- Decision to use project financial tracking.
- Time Tracking:
- Time related fields to include on forms, such as service and billing rate,
- Whether or not you want to show the billing rate to users entering time, and
- First day your company’s work week.
- Currency:
- Your company’s home currency.
- Other Preferences:
- Decision to warn if duplicate check number is used, duplicate bill number is used, or if duplicate journal number is used.
Custom Form Styles
- Customize Your Sales Forms:
- Samples of your current invoice, estimate, sales receipt, and statement templates.
Chart of Accounts
Company chart of accounts
Payroll Settings (QuickBooks Payroll)
Payroll Settings include:
- Payroll Information,
- Business Information,
- Employee Information,
- Tax Information,
- Connect to Your Payroll Bank Account, and
- Sign Your Tax Forms.
Payroll Information
- Payroll history: Have you paid employees in 20XX (current tax year), yes or no?
- Next payday: When is your next payday (month, day, and year)?
Business Information
- Principal business address: business name, address, city, state, and zip code.
- Payroll contact: first and last name, business phone number, and email address.
Employee Information
- Any existing W-4 forms from your employees, and
- Information on each employee, including the following:
- First and last name and email address
- W-4 information:
- Home address (including city, state, zip code)
- Social Security Number
- Federal filing status (single, married filing jointly, head of household, or exempt)
- Dependents claimed, in dollars
- Dollar amounts for other income, deductions, and extra withholding.
- State filing status and extra withholding, in dollars
- Pay schedule
- Employee type (hourly, salary, commission) and pay rate
- Time Off Policies that apply, as well as time off policies your company uses (vacation, sick time, PTO), including the total number of hours an employee can earn each year and maximum hours to be earned (if applicable)
A Time off Policy refers to benefits you offer your employees regarding leave, both paid and unpaid. - Deductions and benefits that apply, as well as any deductions or contributions your company offers, such as such as health insurance plans (medical, dental or vision), retirement plans, Flexible Spending Accounts (FSA), Health Spending Accounts (HSA), and others.
You’ll also need the amount deducted/contributed per pay period, and the annual maximum amount (if applicable) - Payment method (printed check, direct deposit to one or multiple accounts, or a combination)
If direct deposit, you’ll also need an authorization form and voided check, account type (checking or savings), routing number, and account number from the employee - Birth date and hire date
- Year-to-date pay information, including totals for regular wages, federal income tax, social security, Medicare, state income tax, and net pay (optional).
Tax Information
- Business name and address used when filing tax forms (as shown on record with the IRS),
- Previous business owner info (if applicable),
- Company type (sole proprietor, 501c3, corporation, LLC, etc.),
- Title of the company’s Principal Officer,
Your principal officer is the main contact for the company bank account and the person who’s authorized to communicate with state and federal agencies. This is typically the owner. - Employer Identification Number (EIN),
If you started a new business or hired employees.
If you don’t have an EIN, you can complete the SS-4 Application by going to https://sa.www4.irs.gov/modiein/individual/index.jsp. - Federal tax filing requirement and deposit schedule,
Your deposit schedule is based on your total tax liability and is typically provided to you by the IRS before the calendar year begins. If you’re unsure of your deposit schedule, see Publication 15 (Employers Tax Guide), which can be located on the IRS website. The most common form used is Form 941. More about this form and filing will be discussed later in the guide. - Employer Account Number and Registration Number,
If you don’t have an Employer Account Number, you’ll need to request one from your state’s Employment Development Department (EDD). Some EDD’s have a website that allow you to register and obtain your Employer Account Number online. It’s not recommended to file or pay taxes without this, as you run the risk of not receiving credit for the payment. - State Unemployment Insurance (SUI) rate, and
You can contact the EDD to obtain this information if you don’t have it already. - State tax deposit schedule.
Your state deposit schedule will typically be provided with the information regarding your Employer Account Number.
Introduction
As stated in Chapter 2 – Accountant Tools, QuickBooks Online Accountant is a Cloud-based application that allows accounting companies to access, store, manage, and process their bookkeeping, payroll, accounting, business analysis, and tax preparation at any time and from anywhere with an Internet-connected device. The features of QuickBooks Accountant also allow accounting firms to access, store, manage, and process their clients’ bookkeeping, payroll, accounting, business analysis, and tax preparation.
Consortia uses QuickBooks Accountant to:
- Perform our bookkeeping, payroll, accounting, business analysis, and tax preparation.
- Manage, support, and supervise our team (professional staff of payroll personnel, bookkeepers, accountants, business analysts, and tax preparers).
- Manage, support, and supervise our clients’ bookkeepers.
- Perform our clients’ accounting, business analysis, and tax preparation.
This chapter is for accountants who use QuickBooks Online Accountant to perform their company’s bookkeeping, payroll, accounting, business analysis, and tax preparation.
Note: When you use QuickBooks Accountant to perform your bookkeeping, payroll, accounting, business analysis, and tax preparation; you’re better able to perform these services for your clients.
Setup Tools
The following tools are needed to set up your company:
- QuickBooks Online Accountant (Get QuickBooks Accountant for free, see Chapter 2 –Accountant Tools, Join the Free QuickBooks Online ProAdvisor Program),
- QuickBooks Online Accountant Online Payments (See Chapter 2 – Accountant Tools, QuickBooksOnline Payments),
- QuickBooks Online Accountant Online Payroll,• Company online bank account(s) compatible with QuickBooks Online Accountant,
- Company credit card(s) (business credit card or personal credit card used only for business)compatible with QuickBooks Online Accountant, and
- Company one sheet, two-part voucher QuickBooks Online Accountant compatible checks.
Accountant Tasks
Your setup tasks include:
- Gather QuickBooks Online Accountant Setup Information,
- Set Up Your Company,
- Set Up Your Lists,
- Set Up Your Bank and Credit Card Accounts (Bank Feeds), and
- Set Up Your Automated Sales Tax.
Before you can perform these tasks, you need to set up your company in QuickBooks Online Accountant. However, we will first address the differences between QuickBooks Online and QuickBooks OnlineAccountant.
Note: When we refer to QuickBooks Online, we are referring to QuickBooks Online Plus.
QuickBooks Online and QuickBooks Online Accountant Overview
We assume you are familiar with QuickBooks Online. Therefore, we only address the unique features of QuickBooks Online Accountant.
Note: If you’re not familiar with QuickBooks, please refer to our Bookkeeping with QuickBooks OnlineGuide.
The layout in QuickBooks Online Accountant differs slightly from QuickBooks Online. Both have a homepage dashboard, a left menu, and toolbar. However, since QuickBooks Online Accountant enables accounting companies to perform their own accounting and assist their clients with their bookkeeping and payroll, and perform their accounting, business analysis, and tax preparation; QuickBooks Online Accountant has additional features.
Homepage Dashboard
The QuickBooks and QuickBooks Accountant dashboards are the same. The QuickBooks Accountant dashboard pertains to your company’s books.

Left Menu
The QuickBooks Accountant left menu displays two categories:
- Your Practice and
- Your Books

Your Practice includes:
- Clients,
- Team,
- ProAdvisor,
- Work, and
- Apps.
These features enable you to manage your clients, team, ProAdvisor membership, work, and apps. For a
more detailed explanation of these features, refer to Chapter 4 – Setting Up Your Practice.
Your Books includes:
- Overview,
- Dashboard,
- Tasks,
- Banking,
- Sales,
- Cash Flow,
- Expenses,
- Workflows,
- Projects,
- Payroll,
- Time,
- Budgets, and
- Reports.
Note: For a detailed explanation of the Dashboard, Banking, Sales, Cashflow, Expenses, Projects, Payroll, Budgets, and Reports pages, see the Bookkeeping with QuickBooks Online Guide.
Overview

The Overview page displays:
- Company Setup,
- Banking Activity.
- Common Issues, and
- Transaction Volumes.
Company Setup provides your QuickBooks Subscription, Payroll Subscription, Sales Tax enabled or not enabled, and apps.
Banking Activity lists your connected bank and credit card account(s) name, bank balance, QuickBooksOnline Accountant balance, Unaccepted transactions, Unreconciled transactions, and Reconciled Through date.
Common Issues help you find other accounts in QuickBooks Online Accountant that may need your attention such as Undeposited funds, Uncategorized assets, Uncategorized income, Uncategorized expenses, A/R aging more than 90 days, A/P aging more than 90 days, Opening balance equity, and Negative asset and Liability accounts.
Transaction Volumes determine transaction volume workload for bank account transactions, sales receipts, invoices, invoice payments, bank deposits, journal entries, expenses, bills, and bill payments.
Note: When you access your clients’ books through QuickBooks Accountant, the Overview feature displays and provides the same information addressed above for your client.
Tasks
The Tasks page is where you can view, create, assign, and organize tasks for your team.
Workflows
The Workflows page allows you to create workflows to automate common tasks in QuickBooks Online Accountant, such as sending payment reminders to customers. You can also send reminders to your team to complete specific tasks, such as reviewing open invoices.
Time
The Time page takes you to QuickBooks Time. QuickBooks Time allows you to manage and track time for employees and projects, schedule employee shifts, and utilize GPS tracking features.
Commerce
The Commerce page includes features linking additional sales channels to QuickBooks, such as Amazon, eBay, or Shopify.
Toolbar
Like the QuickBooks Online toolbar, the QuickBooks Online Accountant toolbar has an Open and close left menu, Help, Search, Notifications, and Settings (Gear) icons.

Note: The Notifications icon (bell) on the Toolbar displays external notifications from Intuit. There is also a Notifications setting in the Company Settings. This setting displays to internal notifications regarding the work the Primary Administrator receives. See Notifications under Settings below.
Settings
Settings in QuickBooks Online Accountant are arranged somewhat differently than in QuickBooks Online. For example, the QuickBooks Online Settings categories include:
- Your Company – Account and settings, Manage users, Custom form styles, Chart of accounts,Payroll settings, and QuickBooks Labs.
- Lists – All lists, Products and services, Recurring transactions, Attachments, Custom fields, and Tags
- Tools – Order checks, Import data, Import desktop data, Export data, Reconcile, Budgeting, Audit log, Import GoPayment, SmartLook, and Resolution center.
- Profile – Feedback, Refer a friend, and Privacy.
QuickBooks Online Accountant Settings categories include:

- Settings – Company settings, Custom form styles, Chart of accounts, Payroll settings, and QuickBooks Labs.
- Lists – All lists, Products and services, Recurring transactions, Attachments, Custom fields, and Tags.
- Tools – Manage workflows, Reclassify transactions, Order checks, Import data, Import desktop data, Export data, Reconcile, Budgeting, Audit log, Backup company, Import GoPayment, Merge duplicate clients, SmartLook, Transfer clients, and Resolution center.
- Your Company – Subscriptions and billing, Your team, Getting started, Sample company, Feedback, Privacy, and Switch company.
For an explanation of the QuickBooks Online Settings, refer to our Bookkeeping with QuickBooks Online Guide.
The settings are essentially the same with a few exceptions, including:
- Manage workflows,
- Reclassify transactions,
- Backup company,
- Merge duplicate clients,
- Transfer clients,
- Subscriptions and billing,
- Your team,
- Getting started,
- Sample company, and
- Switch company.
Manage Workflows
Manage workflows takes you to the Workflows page, which is also accessed from the Left Menu.
Reclassify Transactions
Reclassify transactions takes you to the Reclassify transactions tool in Accountant Tools. This tool allows you to do a quickly reclassify the account or class on multiple transactions at once. When using the Reclassify tool, QuickBooks Online Accountant automatically hides transactions that cannot be reclassified.
Backup Company
Backup company links you to an external application that allows you to back up your company file data, including transaction and list data. You can also restore and copy company file data from backups.
Merge Duplicate Clients
Merge duplicate clients is a QuickBooks Online Accountant tool that enables you to merge two clients. The tool allows you to choose which client you want to keep, retain the client’s contact information and all access permissions and billing information, and merge transactions and notes from both clients.
Transfer Clients
Transfer clients allows you to move your clients from one QuickBooks Online Accountant profile to another.
Subscriptions and Billing
Subscriptions and billing takes you to a list of the client subscriptions you are managing. You can view and edit your Accountant-billed subscriptions, Client-billed subscriptions, and Billing details.
Your Team
Your team takes you to the Team dashboard, which is also accessed from the Left Menu. The Team dashboard is where you set up and manage your team.
Getting Started
Getting started is a link to Intuit’s Getting Started with QuickBooks Online Accountant webpage.
Sample Company
Sample company is a QuickBooks Accountant account with a sample company, Craig’s Design and Landscaping Services. The sample allows you to use and become familiar with QuickBooks Accountant.
Switch Company
If you are a user of multiple QuickBooks Online companies, Switch company allows you to quickly switch between these accounts.
Accountant Tools
The Go to QuickBooks and Accountant Tools menus and Profile icon are unique to QuickBooks Accountant.

Go to QuickBooks
Go to QuickBooks provides a list of and links to your clients entered into QuickBooks Online Accountant. To access a client’s QuickBooks account, scroll to and select the client’s name. When you want to return to your QuickBooks Accountant account, go to the Go to QuickBooks menu, which has changed to the client’s name, and select Back to practice.

Accountant Tools
Accountant Tools provides a menu consisting of two categories:
- Quick Links and
- Tools.

Quick Links
Quick Links are links to QuickBooks Online Accountant features used most often when assisting your
clients.
The links include:
- Chart of accounts,
- Journal entries,
- Reconcile,
- Reports,
- Voided/deleted transactions,
- Close books, and
- New window (opens a new browser tab or window).
Note: QuickBooks Online Accountant has QuickBooks Keyboard Shortcuts. Using keyboard shortcuts speed up navigation. The shortcuts work in Chrome, Internet Explorer, and Firefox.
To take advantage of QuickBooks keyboard shortcuts, simultaneously press:
ctrl+alt+?(Windows)cmd+alt+?(Mac)

Tools
Tools are QuickBooks Accountant tasks used most often when assisting your clients.
The tools include:
- Notes,
- Reclassify transactions,
- Reports options,
- Write off invoices,
- Prep for taxes,
- ProConnect Tax Online – opens a new browser tab to the ProConnect Tax Online website.
Accountant Tools are addressed later in the guide.
Profile
The Profile icon has Profile and Leads tabs.
The Profile tab is the QuickBooks ProAdvisor’s profile (resume) listed in Intuit’s ProAdvisor Find an Accountant directory at https://quickbooks.intuit.com/find-an-accountant. You fill out your profile by clicking the Pencil icon in the upper right hand corner of each section. Select Save after each section.

The Profile tab displays:
- Performance – Lists the number of Find an Accountant profile views, leads, and inquiries over the last 30 days,
- Profile strength – Displays the strength of your profile determined by the amount and type of information you’ve completed in your Profile,
- Improve your Profile – Provides suggestions to improve the strength of your profile,
- ProAdvisor information section,
- Certifications section – Lists any certifications you have obtained,
- About me,
- Years in business,
- Consultations,
- Services,
- Industries served,
- Languages,
- Social sites,
- Software expertise,
- Credentials, and
- Client reviews.
Once you’ve completed your Profile, select Preview. When you’re ready to publish your profile on Intuit’s Find an Accountant directory, select the Publish profile radio button.
Note: Your Profile won’t go live until you obtain QuickBooks Online Certification.
The Leads tab (page) lists messages from potential clients generated from Intuit’s ProAdvisor Find an Accountant directory.
Gather QuickBooks Accountant Setup Information
To expedite the setup process, you need to gather the information required to set up your company.
The Accounting with QuickBooks Online Accountant Guide provides a detailed checklist, policies, procedures, tips, and other information you need to complete your setup. The QuickBooks Online Accountant Setup Information Checklist below is organized in the same order as the QuickBooks Online Accountant setup process including:
- Company Settings,
- Custom Form Styles,
- Chart of Accounts,
- Payroll Settings,
- Set Up Your Lists,
- Set Up Your Bank and Credit Card Accounts, and
- Set Up Your Automated Sales Tax.
Company Settings
Company Settings include:
- Company,
- Notifications,
- Sales,
- Expenses,
- Payments, and
- Advanced.
Company
- Company Name:
- Company logo file for sales forms and purchase orders,
- Company name as you want it to appear on sales forms and purchase orders, and
- Legal name.
The legal or registered name of your business is the official name of the entity or person that owns a business. If you’re the only owner of your business (sole-proprietorship) without employees, the legal name can be your full name.
- Contact Info:
- Company address,
- Company address shown on sales forms,
- Company legal address (if different),
- Company address where clients contact you or send payments (if different),
- Legal address used for filing taxes (if different),
- Company email address where QuickBooks (Intuit) can email you,
- Company email address where your clients can email you,
- Company phone number shown on sales forms, and
- Company website shown on sales forms.
- Accounting Method:
- Cash accounting or Accrual accounting.
- Employer ID (EIN):
- Company EIN (Employee Identification Number) or SSN (Social Security Number)
If you’re a sole proprietor with no employees and file no excise or pension plan tax returns, you’re not required to obtain an EIN and can use your social security number. However, we suggest you obtain an EIN to protect your social security information.
To apply for an EIN, go to www.irs.gov/businesses/small-businesses-self-employed/apply-for-an-employer-identification-number-ein-online.
- Company EIN (Employee Identification Number) or SSN (Social Security Number)
- Tax Form:
- Tax form your company files.
- Categories:
- If you assign transactions to service departments or product lines, list those departments of product lines.
- If you assign transactions to different locations, list those locations.
- Customer Label:
- Select the term you use to label those you serve (customers, clients, donors, guests, members, patients, or tenants).
Notifications (Work Notifications)
The Notifications listed in the Company Settings are Notifications specific to the Master Administrator. We suggest you turn all notifications on.
Sales
- Sales Form Content:
- Default payment date/invoice terms,
- Default delivery method (send or print),
- Shipping involved with products/services,
- Custom fields used on sales forms,
- Custom transaction numbering system, if you use one, and
- General fields you want to show on sales forms (service date, discount, deposit, tips, and other custom fields).
- Invoice Payments:
- Payment methods available to customers on invoices (Credit cards and ACH).
- Products and Services:
- Columns you want to show on sales forms (Product/Service, SKU),
- Any special pricing (price rules) you offer to customers, and
- Additional columns you want to show on sales forms (Quantity and Price Rate).
- Late Fees:
- Customer late fees and type (flat fee of percentage of remaining balance),
- Grace period, and
A Grace period provides the customer a period of time after the due date that the late fee will still not be applied. - The label or name you want to use for late fees.
- Progress Invoicing:
- Decision to use progress invoicing, which creates multiple partial invoices from a single estimate
- Messages:
- Greeting used on sales forms (ex. Dear [Full Name]),
- Default email subject line on sales forms,
- Default email message sent with sales forms,
- Decision to email yourself a copy of sales form emails and the email address you want them sent to, and
- Cc and Bcc emails that new invoices are sent to, if applicable.
- Reminders:
- Decision to use auto invoice reminders,
- The number of reminders you want customers to receive regarding invoice payments (up to three) and when you want them to receive the reminders,
- Default subject line on reminder emails,
- Default email message on reminders, and
- Decision to email yourself a copy of reminder emails and the email address you want them sent to.
- Online Delivery:
- How you want sales form emails to display (show short summary in email or show full details), and
- The format that sales forms will be sent to customers (Online invoice, HTML, or Plain text).
Online invoice will send an online link to the invoice. This option allows the customer to see any changes made to the invoice.
HTML email will send the invoice in a nice easy to read format. They will not be able to access the invoice via a link like with the Online Invoice option and you’ll need to re-send the invoice if you make any changes you need the customer to see.
Plain text email will send the invoice in a non-formatted version. This will not contain a link either.
- Statements:
- How you want transactions listed on statements (list each transaction as a single line or list each transaction including all details), and
- Decision to show aging table at bottom of statement.
Expenses
- Bills and Expenses:
- Decision to show items table on expense and purchase forms,
Adds a Product/Service table on expense and purchase forms so you can itemize products and services. - Decision to track expenses and items by client,
Adds a Client column on expense and purchase forms so you can track expenses and items by client. - If expenses and items are billable, mark up rates when expenses are billed to customers and decision to track billable expenses as income (in a single account or in multiple accounts) and whether or not to charge sales tax, and
- Default bill payment terms.
- Decision to show items table on expense and purchase forms,
Payments
- Business Owner Info:
- Owner’s address and mobile phone number.
- Chart of Accounts:
- Accounts that standard deposits and processing fees will be posted to.
Advanced
- Accounting:
- First month of fiscal year and income tax year.
This is for reporting, allowing you to specify any month as the start of your fiscal year (also called your financial reporting year or accounting year).
- First month of fiscal year and income tax year.
- Chart of Accounts:
- Decision to use account numbers, and
- Account that tips will be posted to (if applicable).
- Automation:
- Preferred automatic invoicing schedule.
- Projects:
- Decision to use project financial tracking.
This allows you to see all your sales, expenses, and timesheets by project.
- Decision to use project financial tracking.
- Time Tracking:
- Time related fields to include on forms, such as service and billing rate,
- Whether or not you want to show the billing rate to users entering time, and
- First day your company’s work week.
- Currency:
- Your company’s home currency.
- Other Preferences:
- Decision to warn if duplicate check number is used, duplicate bill number is used, or if duplicate journal number is used.
Custom Form Styles
- Customize Your Sales Forms:
- Samples of your current invoice, estimate, sales receipt, and statement templates.
Chart of Accounts
Company chart of accounts
Payroll Settings (QuickBooks Payroll)
Payroll Settings include:
- Payroll Information,
- Business Information,
- Employee Information,
- Tax Information,
- Connect to Your Payroll Bank Account, and
- Sign Your Tax Forms.
Payroll Information
- Payroll history: Have you paid employees in 20XX (current tax year), yes or no?
- Next payday: When is your next payday (month, day, and year)?
Business Information
- Principal business address: business name, address, city, state, and zip code.
- Payroll contact: first and last name, business phone number, and email address.
Employee Information
- Any existing W-4 forms from your employees, and
- Information on each employee, including the following:
- First and last name and email address
- W-4 information:
- Home address (including city, state, zip code)
- Social Security Number
- Federal filing status (single, married filing jointly, head of household, or exempt)
- Dependents claimed, in dollars
- Dollar amounts for other income, deductions, and extra withholding.
- State filing status and extra withholding, in dollars
- Pay schedule
- Employee type (hourly, salary, commission) and pay rate
- Time Off Policies that apply, as well as time off policies your company uses (vacation, sick time, PTO), including the total number of hours an employee can earn each year and maximum hours to be earned (if applicable)
A Time off Policy refers to benefits you offer your employees regarding leave, both paid and unpaid. - Deductions and benefits that apply, as well as any deductions or contributions your company offers, such as such as health insurance plans (medical, dental or vision), retirement plans, Flexible Spending Accounts (FSA), Health Spending Accounts (HSA), and others.
You’ll also need the amount deducted/contributed per pay period, and the annual maximum amount (if applicable) - Payment method (printed check, direct deposit to one or multiple accounts, or a combination)
If direct deposit, you’ll also need an authorization form and voided check, account type (checking or savings), routing number, and account number from the employee - Birth date and hire date
- Year-to-date pay information, including totals for regular wages, federal income tax, social security, Medicare, state income tax, and net pay (optional).
Tax Information
- Business name and address used when filing tax forms (as shown on record with the IRS),
- Previous business owner info (if applicable),
- Company type (sole proprietor, 501c3, corporation, LLC, etc.),
- Title of the company’s Principal Officer,
Your principal officer is the main contact for the company bank account and the person who’s authorized to communicate with state and federal agencies. This is typically the owner. - Employer Identification Number (EIN),
If you started a new business or hired employees.
If you don’t have an EIN, you can complete the SS-4 Application by going to https://sa.www4.irs.gov/modiein/individual/index.jsp. - Federal tax filing requirement and deposit schedule,
Your deposit schedule is based on your total tax liability and is typically provided to you by the IRS before the calendar year begins. If you’re unsure of your deposit schedule, see Publication 15 (Employers Tax Guide), which can be located on the IRS website. The most common form used is Form 941. More about this form and filing will be discussed later in the guide. - Employer Account Number and Registration Number,
If you don’t have an Employer Account Number, you’ll need to request one from your state’s Employment Development Department (EDD). Some EDD’s have a website that allow you to register and obtain your Employer Account Number online. It’s not recommended to file or pay taxes without this, as you run the risk of not receiving credit for the payment. - State Unemployment Insurance (SUI) rate, and
You can contact the EDD to obtain this information if you don’t have it already. - State tax deposit schedule.
Your state deposit schedule will typically be provided with the information regarding your Employer Account Number.